Learn how to use a gas analyzer in five steps: preparation and calibration, sample introduction, measurement, data analysis, and shutdown.
Overview of using gas analyzer
1. Preparation and Calibration
Instrument Inspection:
Check for physical damage and loose components.
Ensure the instrument interior is clean and the pipeline is unobstructed.
Verify that the gas sensor type and measurement range match the target gas.
Calibration:
Select appropriate standard gas based on gas type and concentration range.
Follow the instrument manual for calibration steps, typically involving zero and range calibration.
Calibrate regularly, considering instrument usage, environmental conditions, and standard gas stability.
2. Sample Introduction
Sampling Method:
Direct Sampling: Insert the probe directly into the gas sample.
Extraction Sampling: Use a vacuum pump to draw the sample.
Online Monitoring: Connect the analyzer to the process pipeline for real-time monitoring.
Sampling Pipeline:
Choose a corrosion-resistant, non-adsorbing sampling pipeline.
Ensure the pipeline is airtight to prevent outside air intrusion.
Sampling Flow Rate:
Adjust the sampling flow rate according to the instrument manual’s specifications.
3. Measurement
Parameter Setting:
Set the measurement gas type, range, time, and other parameters.
Select the appropriate measurement mode (continuous, intermittent, etc.).
Start Measurement:
Begin the measurement by pressing the start button.
Monitor the instrument display for stable measurement data.
4. Data Analysis
Record Data:
Record measurement data for analysis. Use the instrument’s built-in storage or export to a computer.
Data Processing:
Analyze data and calculate statistics like average and standard deviation.
Determine if the gas composition meets requirements based on the results.
5. Shutdown
Power Off: Turn off the instrument.
Remove Probe: Remove the sampling probe from the sample.
Clean Up: Clean the instrument and sampling pipeline.
Maintenance: Perform regular maintenance, including filter replacement and sensor cleaning.
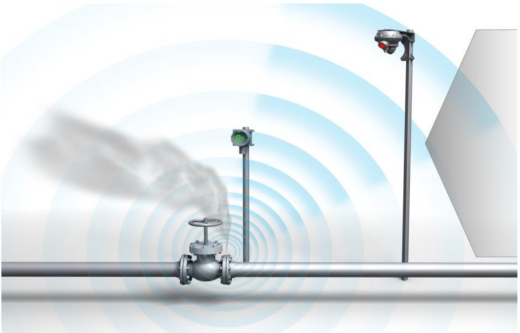
How to use a flue gas analyser
Flue gas analyser mainly consists of sampling system, measuring unit and data processing unit. The sampling system is responsible for extracting flue gas samples from the flue, the measuring unit detects various gas components in the sample, and the data processing unit processes and displays the measured data.
Appliance testing
Boiler combustion efficiency detection: By measuring oxygen, carbon dioxide and other components in the flue gas, the combustion efficiency of the boiler can be calculated and the combustion process can be optimized.
Gas appliance testing: Detect the flue gas components produced by the combustion of gas appliances, evaluate whether the combustion is sufficient, and whether there are safety hazards.
Industrial furnace testing: Detect the flue gas components emitted by industrial furnaces, evaluate pollutant emissions, and provide data support for environmental protection management
Ambient air monitoring
Ambient pollutant monitoring: Monitor the concentration of pollutants such as sulfur dioxide, nitrogen oxides, and particulate matter in the atmosphere to evaluate air quality.
Pollution source emission monitoring: Monitor the flue gas components emitted by industrial enterprises, vehicles and other pollution sources, and regulate pollutant emissions.
How to use exhaust gas analyzer?
An exhaust gas analyzer gives accurate results when used correctly. Here is how it works:
Turn the power switch on.
According to the instrument’s operating interface, select the corresponding measurement parameters, such as the type of gas to be measured, the measurement range, etc.
Start the measurement program, and the instrument will automatically perform sampling, detection and data processing.
Connect hose and probe.
Connect one end of the sampling line to the air inlet of the instrument and the other end to the exhaust outlet to be measured.
Make sure the pipe connection is tight and there is no leakage.
Check the Zero. (If not, push the Zero button)
Zero calibration: Use zero gas to calibrate the instrument to zero point to ensure that the initial value of the instrument is zero when measuring.